

 If you are starting out newly in Cloud computing, SRE/Devops, you will likely come across Vagrant.
This article is focused on providing a simple and practical guide to beginners on what vagrant is.
If you are starting out newly in Cloud computing, SRE/Devops, you will likely come across Vagrant.
This article is focused on providing a simple and practical guide to beginners on what vagrant is.
What is Vagrant ?
Vagrant is an open source software created by Hashicop. It is a portable environment container used to develop and run applications. It is simply a tool for building and managing virtual machine environments in a single workflow. Vagrant lowers development environment setup time by providing an easy and user friendly workflow and automation. Vagrant is written in Ruby language
Vagrant is designed as the simplest and fastest way to create virtualized environment. It is amazingly a great tool for developers, this is because it encourages automation which makes workflow easy.
First! Install Vagrant and VirtualBox
To install Vagrant go to vagrantup.com click on download and download vagrant. It is easy to install, Follow the steps and install by clicking next until it is installed, then click finish. That simple!.
In order to Use Vagrant, you will need to install VirtualBox to serve as a VM provider to the Vagrant .
To install VirtualBox, go to virtualbox.org
What next!
After Installing Vagrant and VirtualBox, go to the vagrant terminal ( you can cmd into a folder to access it) and run the command
vagrant -v
This will list the version of Vagrant installed as shown below.

Create a directory by running the command
mkdir (name of the directory)
Then change directory by running the command
cd
At this stage, you need to open up an IDE of your choice. I used Visual studio code. For Visual studio code, run the command
code .
This will open up the code editor and create a folder were Vagrant file will be stored
Next go the vagrantup.com and click on find Boxes to select a box to use as the operating system (os)
You will see several box options to choose from. I used the ubuntu/trusty64 version 20190514.0.0
Run the following command in the terminal :
vagrant init ubuntu/trusty64
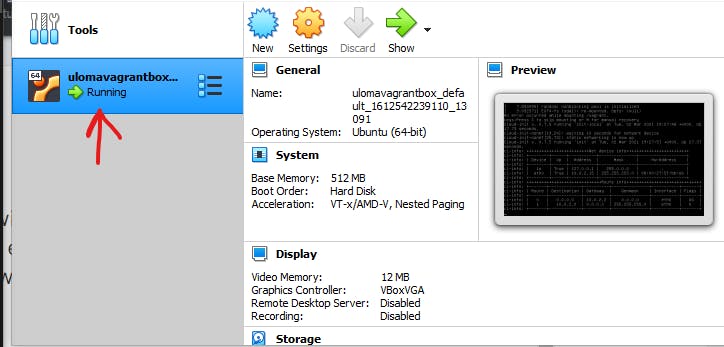
This will will initialize and create a vagrant file with all the configurations needed to run the vagrant inside the the folder that is in the code editor. Open the VirtualBox you installed side by side with the terminal, as this is were you will see that Vagrant is running.
Run the command :
vagrant up
This will get vagrant up and running and ready to be used.
You will see in the virtualBox that vagrant is running as shown bellow
Vagrant configurations
Vagrant has five main parts to it configuration. These configurations are:
Config.vm.box : This is the operating system, in our case in this tutorial we used "ubuntu/trusty64".
Config.vm.provider : This is the VirtualBox
Config.vm.network : This is were the IP addresses and ports are and
how your host system sees your box
4.Config.vm.synced_folder : This is how you access file from your system
5.Config.vm.provision : This is what you want to set up with the Vagrant box
Below is the Vagrant file from my code editor containing the five parts of vagrant configurations.
# -*- mode: ruby -*-
# vi: set ft=ruby :

# All Vagrant configuration is done below. The "2" in Vagrant.configure
# configures the configuration version (we support older styles for
# backwards compatibility). Please don't change it unless you know what
# you're doing.
Vagrant.configure("2") do |config|
  # The most common configuration options are documented and commented below.
  # For a complete reference, please see the online documentation at
  # https://docs.vagrantup.com.

  # Every Vagrant development environment requires a box. You can search for
  # boxes at https://vagrantcloud.com/search.
  config.vm.box = "base"

  # Disable automatic box update checking. If you disable this, then
  # boxes will only be checked for updates when the user runs
  # `vagrant box outdated`. This is not recommended.
  # config.vm.box_check_update = false

  # Create a forwarded port mapping which allows access to a specific port
  # within the machine from a port on the host machine. In the example below,
  # accessing "localhost:8080" will access port 80 on the guest machine.
  # NOTE: This will enable public access to the opened port
   config.vm.network "forwarded_port", guest: 80, host: 8080

  # Create a forwarded port mapping which allows access to a specific port
  # within the machine from a port on the host machine and only allow access
  # via 127.0.0.1 to disable public access
   config.vm.network "forwarded_port", guest: 80, host: 8080, host_ip: "127.0.0.1"

  # Create a private network, which allows host-only access to the machine
  # using a specific IP.
   config.vm.network "private_network", ip: "192.168.33.10"

  # Create a public network, which generally matched to bridged network.
  # Bridged networks make the machine appear as another physical device on
  # your network.
   config.vm.network "public_network"

  # Share an additional folder to the guest VM. The first argument is
  # the path on the host to the actual folder. The second argument is
  # the path on the guest to mount the folder. And the optional third
  # argument is a set of non-required options.
   config.vm.synced_folder "../data", "/vagrant_data"

  # Provider-specific configuration so you can fine-tune various
  # backing providers for Vagrant. These expose provider-specific options.
  # Example for VirtualBox:
  #
   config.vm.provider "virtualbox" do |vb|
  #   # Display the VirtualBox GUI when booting the machine
  #   vb.gui = true
  #
  #   # Customize the amount of memory on the VM:
  #   vb.memory = "1024"
  # end
  #
  # View the documentation for the provider you are using for more
  # information on available options.

  # Enable provisioning with a shell script. Additional provisioners such as
  # Ansible, Chef, Docker, Puppet and Salt are also available. Please see the
  # documentation for more information about their specific syntax and use.
  # config.vm.provision "shell", inline: <<-SHELL
  #   apt-get update
  #   apt-get install -y apache2
  # SHELL
end
Popular Vagrant commands
I will not end this article without mentioning few of Vagrant commands to get started with.
To get Vagrant up run:
vagrant up
To destroy Vagrant, run:
vagrant destroy
to suspend Vagrant, run:
vagrant suspend
To resume Vagrant, run:
vagrant resume
Conclusion
I have come to the end of this article. I introduced you to Vagrant and what vagrant is all about, how to Install Vagrant and VirtualBox and finally how to get vagrant up and running and ready to be used for easy automation of development and operation work.
Stick with me as I will come your way soon to discuss what Vagrant can be used for.